Sunday, December 22, 2013

Forms in multilingual sites of SharePoint 2010/2013

Today, I would like to demonstrate how to create absolutely unique forms for different languages in multilingual sites of SharePoint 2010/2013 with help of SharePoint Forms Designer 2.8.4 and higher.

As an example, I installed German language pack on SharePoint 2010 English and enabled it as alternate language for a site in its settings. Please, note, that absolutely the same steps are working for SharePoint 2013 on-premise as well:
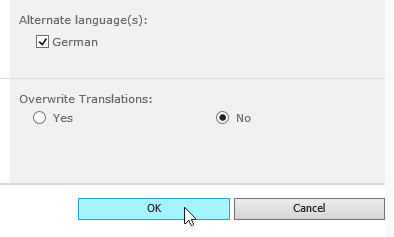
SharePoint set alternate language

Now I create the list of issues and open Forms Designer to create English form first. As you can see titles of fields are displayed in English, because it is currently selected for me. Ok, here is my form:
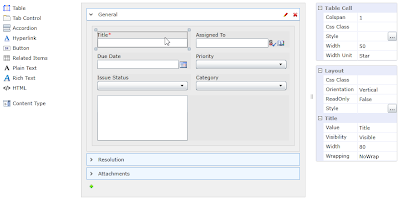
SharePoint custom form for English

In the settings menu I change current language to German and open Forms Designer again:
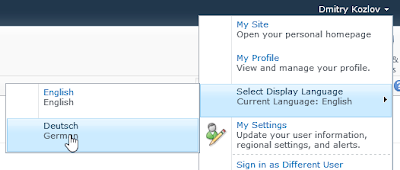
SharePoint language selection menu

If you use SharePoint 2013 you will not find language menu in SharePoint UI, you have to change it in the browser settings: http://olafd.wordpress.com/2012/11/02/switch-language-in-sharepoint-2013/. In Internet Explorer open Internet Options and click Languages button. Here you can set the default language for your browser.

In the designed forms all texts and titles are left in English. I create a new group, let's name it 'German' and select User-defined rule tab. Since Forms Designer 2.8.4 version you can use CurrentLanguage token in rules. It contains the currently selected language code. You can find codes for different languages in the following page: http://msdn.microsoft.com/en-us/goglobal/bb964664.aspx. German code is 1031. Here is my rule:

CurrentLanguage = 1031

Ok, now I remove all fields and texts from my form for this group and as you can see, titles of all fields changed to German. Because of creating the separate group, I can design absolutely unique forms for German with additional notes and other set of fields. Here is an example of such form:
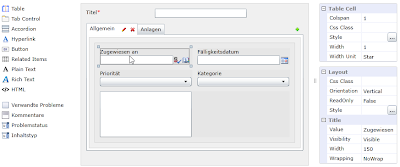
SharePoint custom form for German

Ok, let's test it. When I set English language in my browser or in SharePoint 2010 menu, I see the following form:
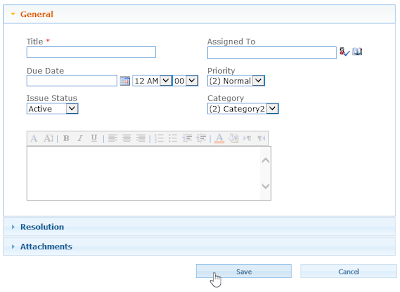
SharePoint English form

Since I change language to German, the same form has the following view:
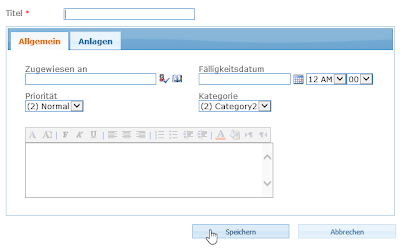
SharePoint German form

Such approach with absolutely different forms for multiple languages is much better than SharePoint provides you out of the box. Without Forms Designer you can just change titles for your columns for different languages but the form itself will be the same. But as you know, length of the same texts in different languages can be much differ. So, if your form has a nice look for one language does not mean that it will not break for others. Moreover, often you have to display different sets of fields for different languages and Forms Designer is very suitable for this case.

Office 365

Since Forms Designer doesn't support groups functionality for Office 365, the only way to modify forms based on the current language is JavaScript. SharePoint has global variable _spPageContextInfo.currentLanguage which contains the current language code. So, you can replace titles, texts and visibility of any fields via Forms Designer JavaScript Framework based on the current language. Example:

if (_spPageContextInfo.currentLanguage == 1031) {
  // Replace titles of fields to German
  fd.field('Title').titleText('Titel');
  fd.field('AssignedTo').titleText('Zugewiesen an');
  …
  // Change title of the first tab:
  $('#fd_tabcontrol-0 > .ui-tabs-nav > li:eq(0) > a').html('Allgemein');

  // Change title of the second tab:
  $('#fd_tabcontrol-0 > .ui-tabs-nav > li:eq(1) > a').html('Anlagen');
}

Please, leave your questions in comments. Thank you.

Tuesday, December 3, 2013

Customization of toolbar buttons and item summary in SharePoint forms

Today I would like to present the new release of SharePoint Forms Designer 2.8.1 and demonstrate its main features. You can find the complete list of improvements on our website. In this article I will focus on customization of the bottom panel with buttons and the selected item info.

For my small demo I chose the list of workflow tasks in SharePoint 2013. By default, forms of this list contain additional buttons at the bottom and have the following view:

SharePoint Forms toolbar with additional buttons

When a user clicks Reject or Approve buttons, Task Outcome column is changed to the appropriate value and the task completes. Based on Task Outcome value workflow detects whether the approval is completed and continues or remains waiting for all the approvers’ decisions.

If we design an edit form with Forms Designer we will get two buttons only: 'Save' and 'Cancel'. To approve task a user will have to select Approved value in Task Outcome drop-down and save the current task. Now I will show, how to add new buttons 'Approve' and 'Reject' to the bottom of a form and define the same logic for them as they have in default forms.

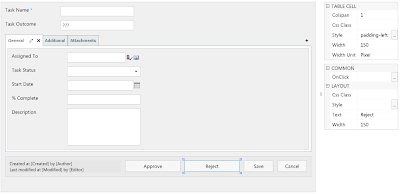
Open Forms Designer, choose Workflow Task (SharePoint 2013) content type and Edit form type. You can find a new toggle button 'Buttons' in the ribbon. When it is checked you can redefine the standard toolbar: add or remove Save and Cancel buttons, append additional info into the summary section of the current item, etc. Check it and you will see the default toolbar at the bottom of your form:

Toolbar button in the ribbon

Default SharePoint form toolbar

Please, pay attention to the text:
Created at [Created] by [Author]
Last modified at [Modified] by [Editor]

Now you can use field values in Rich Text and Plain Text controls. For example, you can put the following text into your form: Hello, [Assigned To]. Please, complete this task by [Due Date]. The text in square brackets will be replaced with the appropriate field values of the current item.

Next, you see Save and Cancel buttons. Choose any of them and in the property grid you will find OnClick property. Here you can define JavaScript, which will be executed when user clicks the button. If you return false in your custom code the form will not be submitted, so, you can define additional validation (e.g. if field A is empty or has incorrect value), next, show an alert message and return false (stay on form).

We will now add Approve and Reject buttons. In the toolbox on the left side of Forms Designer window you can find additional controls Save and Close. They allow to put additional buttons with the same behavior as that of default Save and Cancel buttons. But you can define your custom code in OnClick property. So, I put two Save buttons next to the existing one and change their title to 'Approve' and 'Reject' via property grid:

Customize toolbar with SharePoint Forms Designer

Now, we have to define OnClick handler to set Task Outcome field and change Status to Completed. Please, pay attention that you can change fields via JavaScript only if they are on the form. So, you have to place them in your form but if you don't want to display them to your users you can hide them via CSS. I will demonstrate it below.

Here is the code for Approve button:

fd.field('TaskOutcome').value('Approved');
fd.field('Status').value('Completed');

And for Reject button:

fd.field('TaskOutcome').value('Rejected');
fd.field('Status').value('Completed');

Ok, now we can hide Task Outcome field. Users will change it via Approve and Reject buttons only. Select it in Forms Designer and set Style property on 'display: none'.

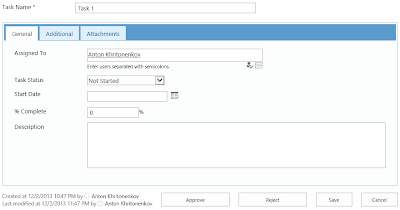
Here is my final form:

SharePoint form with custom toolbar

Please, leave your questions in the comments. Thank you.