Showing posts with label SharePoint new form. Show all posts

Tuesday, November 22, 2016

Kendo Editor in SharePoint forms

In SharePoint Forms Designer 3.1.2 we added some interesting features.

First, now Kendo-widgets detect your culture and use right format and language for date and time controls. So, it has become more comfortable to use kendo date and time pickers in forms:

Localizable Kendo date and time picker in SharePoint form

The second feature is a new template for Multiline Plain Text fields - Kendo Editor:

Kendo Editor template for SharePoint multiline text field

In a form, it appears like this:

Kendo Editor in SharePoint form

You can customize toolbar via JavaScript. Here is the complete list of available tools:

"bold",
"italic",
"underline",
"strikethrough",
"justifyLeft",
"justifyCenter",
"justifyRight",
"justifyFull",
"insertUnorderedList",
"insertOrderedList",
"indent",
"outdent",
"createLink",
"unlink",
"insertImage",
"insertFile",
"subscript",
"superscript",
"createTable",
"addRowAbove",
"addRowBelow",
"addColumnLeft",
"addColumnRight",
"deleteRow",
"deleteColumn",
"viewHtml",
"formatting",
"cleanFormatting",
"fontName",
"fontSize",
"foreColor",
"backColor",
"print"

You can get the current list of tools via JavaScript:

fd.field('Text').control('kendoEditor').done(function(editor) {
    console.log(editor.options.tools);
});

And set a new list:

fd.field('Text').control('kendoEditor').done(function(editor) {
 editor.setOptions({tools: ["bold",
                "italic",
                "underline",
                "strikethrough",
                "justifyLeft",
                "justifyCenter",
                "justifyRight",
                "justifyFull",
                "insertUnorderedList",
                "insertOrderedList",
                "indent",
                "outdent",
                "createLink",
                "unlink",
                "insertImage",
                "insertFile",
                "subscript",
                "superscript",
                "createTable",
                "addRowAbove",
                "addRowBelow",
                "addColumnLeft",
                "addColumnRight",
                "deleteRow",
                "deleteColumn",
                "viewHtml",
                "formatting",
                "cleanFormatting",
                "fontName",
                "fontSize",
                "foreColor",
                "backColor",
                "print"
 ]});
});

Here is the editor with full toolbox:

Kendo Editor with all available tools in SharePoint form

Feel free to ask your questions

Thursday, November 17, 2016

More properties for fields and Kendo Date and Time pickers for dates

In SharePoint Forms Designer 3.1.1 we added a lot of new useful features and here is a short manual of using them.

First, we added changing color, size, and style of font in field`s title and control. Everything is displaying in the field properties.

Customize font style of SharePoint form fields

Second feature is maybe the most significant - now you can define own templates for fields. Just pick ‘Custom’ option in the ‘Template’ property. Next, set custom markup for the control using ‘HTML’ property and custom logic for it with ‘JavaScript’.

Customize view of SharePoint form fields

Another feature we added is pre-defined templates. Currently, they’re available for Date and DateTime fields only. You can change default rendering with Kendo Date and Time picker that looks much better and works faster than the default control.

Replace SharePoint Date and Time fields with Kendo Date and Time pickers Kendo Date and Time picker Kendo Date picker

Upgrade the solution and enjoy!

Monday, May 23, 2016

Creating related items on a new item form via a non-grid related items control

In November we released a feature that allows you to create new items and link them to the current item on a new item form. Up until now, however, you could only do that with the related items control in grid mode. Starting from Forms Designer 3.0.8 you are able to do it with a non-grid mode related items control as well.

Let’s illustrate what we’re talking about. Here’s a form:

New SharePoint form with related items

Let’s add a new related contact:

Adding a related item from a new SharePoint form

It appears in the related items control:

New SharePoint form with an attached item

Then we can save the parent item, when we do so a link is created:

Linking related items to a SharePoint item after saving

Implementation

Open the parent New form in Forms Designer.

Set the related items control to 'Show new items only':

Show new related items only

Add the following line of code to the JS-editor:

fd.populateFieldsInGrid($('.related-items'), {
 RelatedIssue: '{CurrentItem}'
});

Where RelatedIssue is the internal name of a lookup field on the child list to the parent list and related-items is a CSS class name that you need to assign to the related items control in Forms Designer.

Save.

Open child New form in Forms Designer.

Add an HTML control to the form, set CDATA to false, insert the following code to it:

<div id="_fd_parent_temp">
<asp:HiddenField runat="server" ID="_fd_parent_tempField"
__designer:bind="{ddwrt:DataBind('i','_fd_parent_tempField','Value','Load','ID',ddwrt:EscapeDelims(string(@ID)),'@_fd_parent_temp')}" />
</div>
Setting temporary parent ID in a child new form

Add the following code to the JS editor:

$('#_fd_parent_temp > input').val(window.top.fd._tempParentId());

Save the child form.

Explanation

When we added a related items control and saved the form, Forms Designer added a hidden field called '_fd_parent_temp' to the target list. We then added a hidden '_fd_parent_tempField' control to the child form and bound it to the hidden field. When the child form loads, the JavaScript sets a temporary id of the parent item into _fd_parent_tempField. Finally, when the parent item is saved, Forms Designer checks '_fd_parent_temp' for the parent items’ id and sets the 'RelatedIssue' field to the parent item.

Feel free to ask your questions

Wednesday, April 27, 2016

Providing different forms for different users in SharePoint Online

If you want to create different forms to different types of users in Forms Designer for SharePoint Online, you have two options: use permission settings or use SharePoint groups. We’ll look at both options in this article.

Suppose we have two types of users on our SharePoint website: managers and regular users. Managers have elevated privileges and we want to give them a particular set of functionality in a form. And regular users should receive a smaller or a different set of functionality and we want to give them a default form.

What we will do first is create an additional form set for managers using the plus button in the top right corner of Forms Designer.

Adding multiple form sets for a SharePoint list

Using permission settings

SharePoint has inbuilt permissions that we will utilize to distinguish managers from non-managers. Please check this list to see the available permissions:
https://msdn.microsoft.com/EN-US/library/ms412690.

We will pick CreateGroups to differentiate managers from non-managers, as only managers are allowed to create groups on our website.

We then will add an html control onto the default form in Forms Designer and paste the following html code inside it:

<Sharepoint:SPSecurityTrimmedControl runat="server" PermissionsString="CreateGroups" EmitDiv="true">
<script type="text/javascript">
    fd.openForm('fd_Item_52b1ac46-b55e-4d3c-9807-dec2a57b2e9f_EditForm.aspx');
</script>
</Sharepoint:SPSecurityTrimmedControl>
Using SPSecurityTrimmedControl in a SharePoint form

We have used CreateGroups permission string and the name of the form where we want our managers to be redirected to. The name of the form can be seen if you go to the appropriate form set in Forms Designer (in our case it’s Manager) and pick the appropriate form (in our case it’s Edit Form). That is the form that managers will be redirected onto:

SharePoint form filename

Now whenever a manager opens the default edit form he or she will be redirected to his manager-only form, while a non-manager will stay on the default form.

Using SharePoint groups

Another choice we have to set up user group specific forms is by utilizing SharePoint groups.

For this we’ll need to add a JavaScript script to document library. Create a file named redirect.htm and add the following code to it:

<script type="text/javascript">
ExecuteOrDelayUntilScriptLoaded(function () {
 fd.openForm('fd_Item_ee433778-833d-4154-a72f-f68dc876fdc5_EditForm.aspx');
}, 'plumsail.fd.core.js');
</script>

Again, you’ll need to replace the filename as before.

Upload redirect.htm to a document library on your website. Take note of its URL.

Now to go the list with your form sets. Click to edit one of the three forms, we’ll be editing the Edit Form.

Editing SharePoint form page

You’ll be redirected to the default edit form in edit mode, click “Add a Web Part” and add a Content Editor webpart:

Adding Content Editor Web Part to a SharePoint form

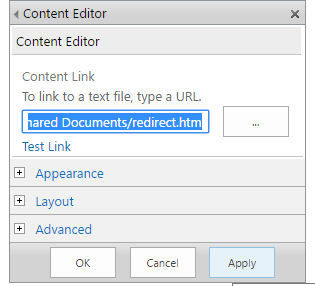
Click the Content Editor Webpart’s little arrow button and click Edit.

Enter the URL of redirect.htm into the box:

Setting Content Link property of the Content Editor Web Part

Expand Advanced and enter the SharePoint group members of which you want to be redirected to the additional edit form, in our case it’d be the site collection owners that will be redirected to the Manager edit form:

Settings Target Audiences property of the Content Editor Web Part

Click OK.

Now all members of the group will be redirected to the Manager edit form, while non-members will stay on the default form.

Tuesday, April 5, 2016

Using ink sketch control in a SharePoint form to place markings on an image from Tablets, iPad, or PC

You can use the sketch control of SharePoint Forms Designer to put markings on an image (note, it won’t add markings to the actual image file but rather it will visually place your markings on top of it).

For example, you may wish to allow your users to draw the directions to somewhere on a map:

Draw on an image in a SharePoint form

Or an insurance company may wish to specify damaged parts of a vehicle on its photographs:

Draw on a picture in a SharePoint form

To set this up you need to be familiar with the ink sketch control, if you are not please read the article.

Once you have you ink sketch control set up, you will need to:

  1. Add a text field to the list, call it PictureURL, place it on the form. This field will contain a URL to the background picture for the ink sketch. Note, you can upload the picture to a document library on you SharePoint site and then just paste the link into this field.
  2. Add the following JavaScript to the form:
    var url = fd.field('PictureURL').value();
    $('.sketch').css('background-image', 'url("' + url + '")');
    
  3. Add CSS Class ‘sketch’ to the ink sketch control.
  4. Set the ink sketch’s height and width attributes to those of the image and save.

Ink Sketch control of SharePoint Forms Designer

Now the user will need to enter some URL that points to an image file into the PictureURL field, save, reload the form and he will get the ink sketch with the image as the background.

Thursday, November 5, 2015

Add related items on a new SharePoint form

We are glad to introduce you our new feature that has become available in SharePoint Forms Designer 3.0.5: the ability to create related items inline and link them to the current item automatically, including when you are on the new item form. You may want to read our post about related items auto-fill here before you proceed.

You may have a related items control on your new item form:

Add related items on a new SharePoint form

And you may want to add an item that is related to the current item. In that case you fill out a field, say Title, and click away or press Enter. The entity is created and with default fields filled out automatically.

New SharePoint form with related items.

Then you click Save and a link between the two items is created. Below is the same item opened in display view after saving. As you can see, the related issue is present:

Edit SharePoint form with related items in the quick edit mode

So, how to set this up? First of all, this feature will only work if:

  • You run SharePoint 2013 On-Premises or SharePoint Online.
  • You run Forms Designer version 3.0.5. In order to update Forms Designer in SharePoint Online simply remove the currently installed version and install the new version from the store.
  • The primary list and the related list are located on the same site.

If everything of the above is true, then let’s go through the setup process.

  1. In Forms Designer drop the related items control and set it’s Quick Edit option to “Only”:
    Related Items in quick edit mode on a SharePoint form
  2. Set up the Data Source as you would do normally
  3. Open up the JavaScript editor and paste something like the following:
    fd.populateFieldsInGrid($('.related-items'), {
     Parent: '{CurrentItem}',
     Assigned_x0020_To: _spPageContextInfo.userId,
     Due_x0020_Date: '12/12/2020',
     Description: 'Related Issue',
     Issue_x0020_Status: 'In Progress',
     Additional_x0020_information: 'This is a supervised issue.',
    });


    Draw attention to Parent: '{CurrentItem}'. Parent is a lookup field to the current list, which is being used as the filter by value in the related items control. It can be displayed in the control, but it doesn’t have to. {CurrentItem} is the new token that specifies the current item, using this token allows you to link related items to the current item even when it has not yet been created.

    I won’t discuss the function fd.populateFieldsInGrid and its syntax further here, please see the aforementioned blog post about it if required.

  4. Add ‘related-items’ CSS Class to the related items control. This class is used in fd.populateFieldsInGrid function to identify the related items control.

    That’s it, now the Parent field of inline-created related items will be set to the current item when the item is saved.

Thursday, July 9, 2015

Passing and getting Date object to and from date and datetime fields

Another new feature we introduced in FormsDesigner 3.0.1 is the ability to interact with date and datetime fields by passing JavaScript Date objects. This feature takes away the need for consumer to think about parsing dates in locale specific formats and simplifies the way date operations are performed on date/datetime fields. Let us take a look at the following use case.

SharePoint issue form

Here we have our old form for creating new issues. Suppose the priority of an issue we set affects the due date for its resolution: high priority implies that the issue is to be resolved within two days, normal priority implies a 5 day period and low priority leaves the due date undefined.

Because the due date periods are pre-defined and are standard for all issues, we want to auto-assign them based on the priority we set. Here’s how we’ll go about doing it: get the current Date object, add the required number of days to it and set the object to our Due Date field.

This is the code we added to our form to achieve this effect:

function setDate(){
    var date = new Date();
 
    switch (fd.field('Priority').value()) {
        case 'High':
            date.setDate(date.getDate() + 2);
            break;
        case 'Normal':
            date.setDate(date.getDate() + 5);
            break;
        default:
            date = null;
    }
 
    fd.field('DueDate').value(date);
} 

setDate();

fd.field('Priority').change(setDate);

What this code does is:

  1. It defines setDate() method which:
    • Creates a Date object which is initialized with the current date.
    • Checks the value inside the Priority field and depending on it, gets the current date value and adds the respective days offset value.
    • Sets the resulting date object to the field.
  2. It calls the setDate() method when the form is loaded.
  3. And it defines a change event, which calls the setDate() method whenever the Priority value changes.

Now, after we’ve saved our form, we can open it up and see how it works.

Whenever we change the priority value, the due date is automatically readjusted:

SharePoint high-priority issue

High priority.

SharePoint normal-priority issue

Normal priority.

SharePoint low-priority issue

Low priority.

Note

This approach is particularly advantageous if your form is potentially browsed in environments with varying locales, as different locales mean different date formats, which our JavaScript functions take care of.

Wednesday, July 8, 2015

Designing custom forms for smartphones, tablet devices, and regular PCs

Today we’d like to introduce you our new Forms Designer 3.0.1 feature for building custom forms for various types of devices, be it mobile phones, tablets or regular PCs. For all these types you can now create separate Display, New and Edit forms which enables you to customize the way different devices view your website. Let’s take a look at a use case.

Say we have a form that looks like this:

SharePoint form for PC

Navigating such form on a mobile device would be pretty cumbersome, as you can imagine. What we need to come up with is something that looks more like this:

SharePoint form for mobile device

How can we achieve this? The short answer would be to use features introduced in Forms Designer 3.0.1:

  • fd.isMobileDevice() and fd.isTabletDevice() JavaScript functions
  • IsMobileDevice and IsTabletDevice Group values (available only in On-Premises version of SharePoint).

Before we proceed, however, we need to turn off the SharePoint site feature called ‘Mobile Browser View’ as it’s not compatible with Forms Designer. To do this go to Site Settings → Manage site features (under Site Actions) → click ‘Deactivate’ against ‘Mobile Browser View’.

Let us look at a how we would utilize these features for our use case in both versions of SharePoint.

Designing for mobile devices in SharePoint Online

In Forms Designer for SharePoint Online we have form sets, meaning we can create any number of forms for each of the SharePoint form types (Display, New, Edit). Utilizing our fd.isMobileDevice() and fd.isTabletDevice() we can check if our user agent requires a mobile version of our form and redirect him to it.

Our initial form in Forms Designer:

Design of SharePoint form for PC

Let us add a new form set for ‘New Form’ called ‘Mobile’. To do this, click the ‘+’ button in the top-right corner of the window and get the following dialog:

Form set for mobile devices

We’ll enter ‘Mobile’, click OK.

Here we can design a mobile device-friendly version of our form (don’t forget to click ‘Save’, navigating to another form will cause your changes to be lost):

Design of SharePoint form for mobile devices

What we’ve done here is created a miniature version of our logo, brought out required fields onto the main window to allow for a simpler fill-in process, replaced the tab control with an accordion and made the whole form is fit a regular sized smartphone (by placing everything inside a table and setting the table’s size – which is also a new feature of 3.0.1).

Before we go further, look at the bottom-left corner of the window where it says ‘File: xxxxxx.aspx’. Take a note of this filename, we’ll need it later when we write our JavaScript code.

Now that we have designed our mobile version of the form we need to implement the redirect logic. Let’s go back to our default ‘New Form’ and open up the JS editor. This is the code we will add:

if (fd.isMobileDevice() || fd.isTabletDevice())
{
    fd.openForm('fd_Item_e05e9ae8-7eaa-49da-9ad0-0b2fe258e719_NewForm.aspx');
}

What we’re doing here is:

  1. Checking if the user is on a mobile device or tablet with fd.isMobileDevice() || fd.isTabletDevice().
  2. If he is, we’re opening the appropriate form by specifying the filename we have copied above in fd.openForm(filename).

After we’ve pasted in our code with the appropriate filename and saved our form, we’re done. What will now happen is every time a user clicks ‘Add new item’ he will be redirected to a mobile version of the ‘New Form’ if he’s using a mobile phone or a tablet (and if he’s not using a mobile device, he will stay on the initial desktop-friendly form).

The very same procedure would be used if we were creating mobile versions of ‘Edit’ and ‘Display’ forms.

Let’s now have a look at how you could achieve the same thing in SharePoint On-Premises.

Designing for mobile devices in SharePoint On-Premises

The procedure for providing desktop and mobile device versions of a form is even simpler in SharePoint On-Premises: you don’t need to write custom JavaScript code to redirect the user, you can use IsMobileDevice and IsTabletDevice group tokens instead.

Let’s open up the ‘New Form’ form in Forms Designer. We will use exactly the same set-up shown in the previous section.

What we’ll do is add a new group by clicking the ‘+’ button in the top-right corner of the window.

Group of SharePoint forms for mobile devices

We’ll call this group ‘Mobile’ and in ‘User-defined rule’ tab we’ll add the following code:

IsMobileDevice || IsTabletDevice

Click ‘Validate’ and ‘OK’.

A new form will be created as a copy of the desktop form. We’ll change it to make it look the way we want, as shown in the previous section.

Click ‘Save’, and we’re done. Now whenever user wants to add a new item he will be directed to the appropriate form, depending on the type of device he’s using.

Wednesday, December 3, 2014

Capture signature or hand-written notes in SharePoint form using tablets or mouse.

In this article I will describe the implementation of two business cases which require capturing hand-written marks and a signature in a form. I will use SharePoint Forms Designer 2.8.12 where Ink Sketch control appeared. With the help of this control you can save a hand-written note created with a tablet, a cell phone, or a mouse to a SharePoint 'Multiple lines of text' field with picked 'Plain text' option:

SharePoint 'Multiple lines of text' field with picked 'Plain text' option

It supports all editions of SharePoint 2010/2013 and SharePoint Online in Office 365.

Review of end-of-course questionnaire

The first scenario relates to a training process that ends with questionnaires which have to be filled in by trainees and verified by a trainer. We will simplify the verification process by providing a trainer with the touch interface allowing them to leave marks and notes by using iPad, a cell phone or another touch screen device. The result form for trainers will have the following view:

SharePoint questionnaire form with hand-written marks

First, we should create a form for questionnaire and design different views for students and trainers. I will split them into separate SharePoint groups and create different forms for these groups in Forms Designer. Forms Designer for Office 365 doesn't support groups functionality, so you should modify the result form with the help of JavaScript based on the current user. The first group, students, will be able to edit all fields except the score. The second group, trainers, will be able to score a student and leave marks and notes near each answer. We have to create a number of text fields to save trainer's notes in accordance with the number of Ink Sketch controls on a form. In our case we will use a separate Ink Sketch control for each student's answer, so we need to create the same number of text fields as the number of questions in the questionnaire.

Notice: fields for storing sketches must have 'Multiple lines of text' type with picked 'Plain text' option. You must select the field where you're going to store the sketch in the Ink Sketch properties in Forms Designer.

Here is the first form designed for trainees:

SharePoint questionnaire form for trainees

Here is the form designed for trainers:

SharePoint questionnaire form for trainers with hand-written notes

As you can see I turned all fields into read-only mode and put Ink Sketch controls near each field to allow trainers to make a separate note for each answer. Also the form for trainers contains the score field in edit mode.

Invoice with signature

The second scenario covers creating an invoice form with signature. As previously, we should create a text field to store the signature. Here you can see my invoice form:

SharePoint form with signature

I used the Related items control to display product items and the Ink Sketch control to capture the signature. Quite easy isn't it? You can use Forms Designer in conjunction with Workflow Actions Pack to create an invoice in PDF format with the signature and send it to your customer or accounting department by e-mail.

SharePoint 2010 and HTML 5

By default, Internet Explorer opens SharePoint 2010 pages in IE 8 document mode but IE 8 doesn't support HTML 5. So the Ink Sketch control uses flash component to provide the capability of drawing on a form. This component is quite slow and requires Adobe Flash Player. But you can switch the Ink Sketch control to HTML 5 mode by modifying your master page. Open it in SharePoint Designer and replace the following line of code:

<meta http-equiv="X-UA-Compatible" content="IE=8"/>

With this one:

<meta http-equiv="X-UA-Compatible" content="IE=Edge"/>

Save the master page and check in. Now all pages will work in the highest mode of Internet Explorer available.

Conclusion

The visual data is saved into SharePoint text fields as base64 string, so you can use it in Render Text Template workflow action of Plumsail Actions Pack to prepare an HTML-page and generate a PDF-file based on it with a signature and other notes created by a user directly on a form. To inject a note into HTML-template you should use the following syntax:

<img src="${{Signature}}" />

In the code above 'Signature' is the internal name of a 'Multiple lines of text' field containing the signature.

Tuesday, June 10, 2014

Publish a form for anonymous users on a public site in Office 365

In this article I will demonstrate how to design forms for public sites in Office 365 with help of Forms Designer and make them available for anonymous users. As an example, I will create a simple feedback form and place it onto the Contact Us page.

First, we need to create a list to store the requests from anonymous users. I've called it 'Requests' and configured with the following columns: Phone, Email and Message.

SharePoint List Columns

Ok, now I have to grant anonymous users a permission to add new items. Unfortunately, SharePoint Online doesn't provide an interface to achieve it but there is a third party tool that allows to manage anonymous access:
http://anonymous365.codeplex.com/

Upload the solution above to the catalog:
{your public site domain}/_catalogs/solutions/Forms/AllItems.aspx

Activate it. Next, make sure that the limit of server resources for your public site doesn't equal to zero in SharePoint admin center or expand the quota otherwise:

SharePoint Online Admin Center
SharePoint Site Resource Quota

Now, you can find 'Anonymous Access' button on the ribbon of the list:

SharePoint Online Anonymous Access

Open the Requests list, click 'Anonymous Access' and select 'Allow anonymous users to add items to this list' option. Now, when we've provided users with an access to add items, we can deactivate and remove Wsp365.Anonymous.wsp solution.

Next, lets create a 'Thank you' page where the user will be redirected after submission of the form. I've made a new publishing page with the following content: '​Thank you for your message. We will contact you soon.'

Almost done. Now, we need to design a form and publish it onto the Contact Us page. Start Forms Designer to design a new form: go to the Site Contents page, click Forms Designer app, choose Requests list in the drop-down and click Start:

Start Forms Designer

Here is my form:

SharePoint New Custom Forms

General settings:

SharePoint Form General Settings

Click Export button on the ribbon to save the form into a file. Open Contact Us page, turn it into Edit mode and insert the exported form:

SharePoint Public Form

Publish the page. If your form contains required fields, you should fill them in to pass the validation. Here is the result:

SharePoint Online Contact Us Form

With help of our JS-framework you can add extra validation for e-mail and phone number fields if required. Get more information on how to publish forms onto SharePoint pages:
http://www.youtube.com/watch?v=-Lj0dMB-Cww&hd=1
http://formsdesigner.blogspot.com/2014/01/publish-designed-form-to-any-page.html

Please, do not hesitate to leave your questions in the comments.