Showing posts with label Lookup. Show all posts

Friday, July 29, 2016

Cross-site Lookup to a SharePoint list with more than 5000 items

Today, I wanted to demonstrate how to adjust Plumsail Cross-site Lookup fields for a list with more than 5000 items. As you might know, SharePoint has a constraint on a view that does not allow you to filter or sort a view containing more than 5000 items. This constraint prevents users from searching items in Cross-site Lookup drop-down. Now I will show you how to work around this restriction.

First, you need to create indices for all columns of the source list by which you're going to filter items in the Cross-site Lookup drop-down. By default, the only field that requires an index is the field that you've picked in the 'Field' drop-down of the Plumsail Lookup Manager.

A display field in Cross-site Lookup Manager

Go to the source list's settings and click 'Indexed columns' under the list of columns. Create an index for each column that requires it.

Next, open the Lookup Manager and expand Advanced settings section. In the 'Request items' snippet, you have to remove 'orderby' clause from the first request because SharePoint does not allow you to sort a view containing more than 5000 items even by an indexed column. The result snippet will be:

function (term, page) {
  if (!term || term.length == 0) {
    return "{WebUrl}/_api/web/lists('{ListId}')/items?$select=Id,{LookupField}&$top=10";
  }
  return "{WebUrl}/_api/web/lists('{ListId}')/items?$select=Id,{LookupField}&$orderby={LookupField}&$filter=startswith({LookupField}, '" + encodeURIComponent(term) + "')&$top=10";
}

And here you go:

Searching in a list containing more than 5000 items with Plumsail Cross-site Lookup

Please, note that if your filtering criteria is not concrete, say, you typed just a single letter, the result may contain more than 5000 items and you will get an error in the drop-down. Just continue typing to decrease the number of filtered items and you will get the result.

Tuesday, April 26, 2016

Using a Cross-site Lookup to a SharePoint list with an exceeded threshold limit

In SharePoint there is a default limit of 5000 items that you can add to a list until you are unable to filter that list. For more information on this see here.

What this means in practice is that you are unable to use a SharePoint Cross-site Lookup field that points to a list with an exceeded threshold. In this article we will describe a way of how you can go around the problem.

Note that in SharePoint On-Premises you can increase the threshold limit, for that you can check this article (it’s for SharePoint 2010, but 2013 is the same).

If you cannot or don’t want to change the limit, follow this procedure:

  1. Index the columns that your use to filter the list items by. Here you should include any fields you’re using in the filter=… part of the query (go to Manage Plumsail Lookups → Request items to see code that returns the two queries)
  2. Remove the orderby parameter from the first query (note the lack of the orderby parameter in the following example)
function (term, page) {
    if (!term || term.length == 0) {
        return "{WebUrl}/_api/web/lists('{ListId}')/items?$select=Id,{LookupField}&$top=10";
    }
    return "{WebUrl}/_api/web/lists('{ListId}')/items?$select=Id,{LookupField}&$orderby={LookupField}&$filter=startswith({LookupField}, '" + encodeURIComponent(term) + "')&$top=10";
}

Friday, January 9, 2015

Filter related items by almost any field of SharePoint form

In this article I'd like to introduce you to a new feature of SharePoint Forms Designer 2.9.1 allowing to filter the Related items control by almost any form field including lookup, single line of text, number, choice, date, user, and even calculated column. First, I want to demonstrate the most common case, filtering by a lookup column.

Filtering by Lookup column

I've created a list of projects and a related list of issues. The Issues list contains a lookup column to the Projects list. Now I will show how to create a form for the Projects list with the list of related issues in it. We need to put the Related items control onto the project form and configure its data source following way:

Filter related items by lookup column on SharePoint form

Project column of the source list is a lookup to the Projects list. Here is the result:

Filter related items by lookup column on SharePoint form

As you might noticed I've configured filtering by a display column of the lookup column. But if you say have multiple projects with the same title you will see issues of all such projects in the same form. To avoid this you should add ID of the parent list as an additional column in the lookup settings:

Additional lookup field

Now you can filter the related issues by ID of the parent item in the Data Source Editor:

Filter related items by lookup ID column on SharePoint form

Filtering by Date column

Ok, now let's configure filtering by a date column. I've created Daily Reports list to store forms with the list of solved issues filtered by a date specified in the report. As previously, we need to place the Related items control onto the form in Forms Designer and configure its data source following way:

Filter related items by date column on SharePoint form

DateCompleted is a field of the Issues list containing resolution date of an issue. Here is the result:

Filter related items by date column on SharePoint form

Filtering by User column

And finally, I'd like to demonstrate how to filter the Related items control by a people picker field. For this case I've created User Reports list containing a people picker field. Next, we need to design a form with the Related items control linked to the Issues list and filtered by the people picker column:

Filter related items by user column on SharePoint form

Almost done. But in contrast to the previous cases we have to do additional stuff here because SharePoint returns people picker value as a link. So we need to extract plain username from the link and pass it outside the form to filter the related items properly. Put HTML-control onto your form, switch CDATA property to False and insert the following code into Content property:

<xsl:variable name="UserName" select="substring-after(substring-before(substring-after(@User,'userdisp.aspx?ID='),'&lt;'),'&gt;')"/>
<xsl:comment>
<xsl:value-of select="ddwrt:GenFireConnection(concat('*', '@User=', ddwrt:ConnEncode(string($UserName))), '')" />
</xsl:comment>

Please, pay attention that to make this sample working you have to replace the highlighted attributes with the internal name of your people picker field (Form field). Here is the report:

Filter related items by user column on SharePoint form

Summary

In this article I demonstrated how to filter related items by almost any field of the parent form. Please, note that if you need to filter related items by multiple columns, you can concatenate them into a single calculated field and configure filtering by this column. Feel free to ask your questions in the comments.

Wednesday, July 10, 2013

Cascading drop-downs with Cross-site Lookup For SharePoint 2013 and Office 365

In the previous entries I showed how to configure Cross-site Lookup column and how to modify the template of the lookup result set. Now I'm going to demonstrate how to use Cross-site Lookup with Forms Designer and build dependent columns and cascading dropdown in particular with this complex solution. Please, note, Cross-site Lookup is supported by Forms Designer starting from version 2.6.4930.

Let's imagine that our company has offices in multiple countries and we have to create a ticket system. In the ticket form users have to specify their office. In order to simplify this task we can also add a country field to the ticket form. So, when the user chooses a country in the form the dropdown of offices is automatically filtered by the selected country. This behavior is called cascading dropdowns.

Ok, I will use lists from my previous articles: Countries and Target. I added a new list called Offices to the same site where Countries list is located. Then I created a simple lookup field in Offices and set Countries as its source list. So, now we can specify the country for each office. Here is a new Office form:

SharePoint 2013 lookup

Let's imagine that our Target list is the list of tickets from my previous example. We have already created Cross-site Lookup column for country in Target list. Now we have to create Office lookup field that is linked to Offices list. The both lookups do not allow multiple values. Now we have to use Forms Designer to place both of these fields into the form. Forms Designer is required in this scenario because we will use its JavaScript framework.

Here is a new Target form:

SharePoint 2013 cascading lookups

Now let's open Cross-site Lookup management window and select Office field there. Expand Additional settings. Here we have to modify 'Request items' template to load only those offices which belong to the selected country. Here is my template:

function (term, page) {
  // Getting the selected country
  var countryId = fd.field('Country').value();
  if (!countryId) {
    countryId = 0;
  }
  
  // Filtering by the selected country
  if (!term || term.length == 0) {
    return "{WebUrl}/_api/web/lists('{ListId}')/items?$select=Id,{LookupField},Country/Id&$orderby=Created desc&$expand=Country/Id&$filter=Country/Id eq " + countryId + "&$top=10";
  }
  return "{WebUrl}/_api/web/lists('{ListId}')/items?$select=Id,{LookupField},Country/Id&$orderby={LookupField}&$expand=Country/Id&$filter=startswith({LookupField}, '" + term + "') and Country/Id eq " + countryId + "&$top=10";
}

First I get the selected country field with Forms Designer's JavaScript framework. Then I use it in requests as additional filter. Pay attention to the requests. Firstly, to use a field in the filter you have to add it into the select part of the query. Secondly, if you use lookup column in the filter you have to use required $expand operator. You can find detailed info on using lookup column in SharePoint 2013 REST API in the following article: http://www.andrewconnell.com/blog/Applying-Filters-to-Lookup-Fields-with-the-SP2013-REST-API

Now, when we choose a country in the form, the drop down list of offices is automatically filtered by the selected country:

Cascading lookups in SharePoint 2013 and Office 365

The last thing we have to do is to clear Office field when Country is changed. Open Forms Designer and go to its JS-editor. Put the following code there and save the layout for edit and new forms:

fd.field('Country').change(function() {
  fd.field('Office').value(0);
});

As you can see Forms Designer's JavaScript framework supports Cross-site Lookup field like any standard field. So, you can dynamically get and set values, handle value changing events, make selection controls readonly and etc.

Cross-site Lookup column for SharePoint 2013 and SharePoint Online in Office 365

In this article I would like to present our new solution Cross-site Lookup for SharePoint 2013 and SharePoint Online in Office 365. With help of this feature you can create lookup columns with quick search and asynchronous loading of results for lists and libraries to link data from any sites within a site collection.

First, I would like to cover the technical aspects of this solution. Our lookup is not a custom field because custom fields can be deployed only as part of farm solutions which are not available for Office 365. So, we made it as a number of JavaScript templates (view, edit, new and display) for standard Lookup field. We used JSLink property of SPField class to inject these templates and Select2 control with some modifications as control for searching and navigating through the source list.

Now I will demonstrate our solution in action. In the root web of the root site collection I created a list of countries. Next I created a new site collection in the same web application and added a custom list to its root site and named it Target. Ok, let's create a new lookup column in Target list which links to Countries list in the root site collection.

Open the view of Target list and click 'Plumsail Lookup ' button in 'List' tab of the ribbon.

SharePoint 2013 Cross-site Lookup

If you don't have the existing lookup column in your list you will see a dialog for creating a new lookup field. Enter the name of this field in text box and click Ok.

Create cross-site lookup in SharePoint 2013

After the field has been successfully added you can configure it. First, let's change the source list. Click 'Change ' link near the web url to specify the web of your source link. I clear this field because my source list is located in the root site of the root site collection. Ok.

Now select the source list in the next dropdown and the field of the source list which will be shown in the target list. In my case the source list is Countries and the field is Title. Ok.

Cross-site lookup column for SharePoint 2013 settings

By checking appropriate options you can enable multiple values for your lookup and add 'New Item' link which allows users to add new items to the source list directly from the form.

If you check Add 'New Item' link you will see the following options:

SharePoint 2013 lookup with add new item link option

In the first field you can specify the title of the new item link. The second one is for default content type ID. When the user clicks the new item link they will see a form for the specified content type. If you leave this field empty, users will see a form for the default content type of the source list.

Here is what this link looks like in the form:

SharePoint 2013 lookup with add new item link

I will cover Advanced section fields in the next article. Now, let's see what our lookup field looks like in forms and list views.

Lookup column with a single value:

SharePoint 2013 lookup with single value

Lookup column with multiple values:

SharePoint 2013 cross-site lookup with multiple values

List view:

SharePoint 2013 cross-site lookup in the list view

Display form:

SharePoint 2013 cross-site lookup in display form

Looks perfect. In the next articles I will demonstrate how to change the template of the result set in the select box of Cross-site Lookup Column, how to use Lookup and Forms Designer together and create dependent columns and cascading dropdowns.

Tuesday, April 9, 2013

SharePoint 2013 form with related items list (part 1)

Note: This entry is outdated. The current version of Forms Designer contains 'Related Items' control which can be distributed anywhere in the form and quickly configured via its properties. Please, see our article about this new functionality. And of course, if you already have a license you can upgrade it to the latest version for free.

One of the usual cases of our customers is to create a form with related items, e. g. an order form with the list of items of the order. I will demonstrate how to place related items in the separate tab of the parent form and add or edit them directly in the current tab. I divided this manual into 3 parts:

  1. Display form
  2. Edit form
  3. New form

In this entry I will show how to create a display form with tabs and place related items into the separate tab. I created the list of orders and the list of order items with the following columns: Product Name (renamed Title), Weight, Width, Height, Depth, Quantity and Total price. I added lookup field OrderNum into the list of order items to link items with the order.

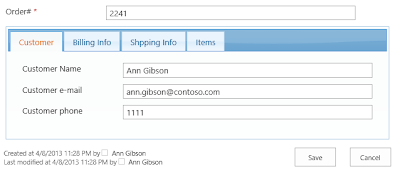
First, I designed forms of an order with Forms Designer, added tabs 'Customer', 'Billing Info', 'Shipping Info' and 'Items'. I will put related items in the 'Items' tab, which is now empty. Here is my form:
SharePoint form with tabs

Next, I changed the order items list setting to open forms in a dialog window. So users will be able to edit order items directly from the order form without leaving it. The described option is located here: List Settings -> Advanced settings -> Launch forms in a dialog

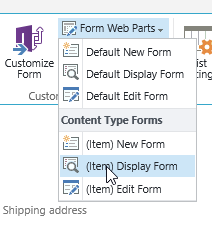
Now, go to the orders list and select List tab in the ribbon. Choose Form Web Parts drop down and select (Item) Display Form:
SharePoint form web parts

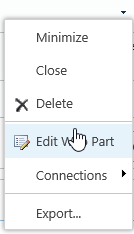
Click 'Add a Web Part' and select Order Items list. In the web part menu select 'Edit Web Part' item.
SharePoint edit web part

We will not allow users to edit the list of items in the display form of an order. So, first of all we have to disable links 'new item' and 'edit' on the top of the list. Change Toolbar Type to 'No Toolbar' in the settings window.

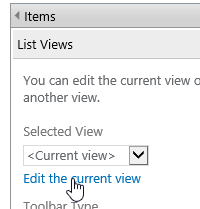
Next, click 'Edit the current view' link:
SharePoint edit current view

Here remove 'Product Name (linked to item with edit menu)' column from the view and replace it with Product Name (linked to item). Now users will not see an order item's context menu.

In the 'Totals' section I added the sum of Total Price to display it for the selected order. Ok, save the view. Next, we have to move the list of order items into the 'Items' tab and filter them by the current order.

Open Forms Designer editor for Orders list and select Display Form. Open JavaScript editor. The following JavaScript takes the first web part and replaces it into the fourth tab:

var wp0 = $('div[id^="MSOZoneCell_WebPartWPQ"]:eq(0)');
wp0.detach().appendTo('#fd_tabcontrol-0-tab-4');

When user clicks anywhere on the table of items, new tabs appear in the ribbon: Items and List. We have to disable this functionality to forbid users to edit the list of order items from a display form of an order. Paste the following row into JavaScript editor to disable mouse and keyboard events:

wp0.attr("onmouseup", "").attr("onkeyup", "");

Ok, save the display form, close Forms Designer and open any order in the display mode. Now you can see that the order items list appears in the 'Items' tab. The last thing we have to do is to filter this list by the current order. Open our display form in SharePoint Designer. Files generated with Forms Designer start with fd_{Content Type Name}_{Form Type}. So, my display form is called fd_Item_Display.aspx.

Find XsltListViewWebPart that renders Order Items list. Add a new binding parameter into ParameterBindings section:

<ParameterBinding Name="OrderId" Location="QueryString(ID)" DefaultValue="0"/>

Here we bound OrderId to get-parameter ID that contains the current order id value. You can find more info about parameter bindings here:
http://blogs.msdn.com/b/joshuag/archive/2009/04/06/dataformwebpart-parameters-and-parameterbindings.aspx

Now we can use 'OrderId' parameter in CAML-query:

<Where>
  <Eq>
    <FieldRef Name="OrderNum" LookupId="TRUE"/>
    <Value Type="Lookup">{OrderId}</Value>
  </Eq>
</Where>

'OrderNum' is an internal name of my lookup field. Place the code above into Query section and save the page.

Now on the display form of an order we can see order items related to the current order only. Here is my final display form:
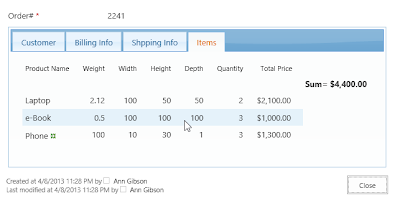
SharePoint form with the list of related items

When users click on product name they see display form of an item in a dialog window:
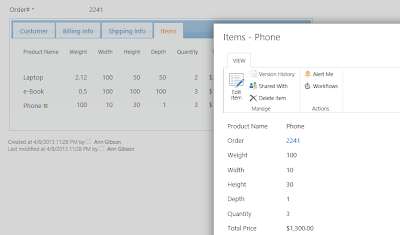
SharePoint related item form